Let's start this tutorial by looking at the <canvas> element itself.
<canvas id="tutorial" width="150" height="150"> </canvas>
The <canvas> element has only two attributes - width and height.
These are both optional and can also be set using DOM properties.
When no width and height attributes are specified, the canvas will initially
be 300 pixels wide and 150 pixels high.
The element can be sized arbitrarily by CSS, but during rendering the image
is scaled to fit its layout size.
(If your renderings seem distorted, try specifying your width and height attributes
explicitly in the <canvas> attributes, and not with CSS.)
The id attribute isn't specific to the <canvas> element
but is one of the default HTML attributes which can be applied to (almost) every HTML element
(like class for instance).
It's always a good idea to supply an id because this makes it much easier to identify it
in our script.
The <canvas> element can be styled just like any normal image (margin, border, background, etc). These rules however don't affect the actual drawing on the canvas. We'll see how this is done later in this tutorial. When no styling rules are applied to the canvas it will initially be fully transparent.
getContext() takes one parameter, the type of context.
	var canvas = document.getElementById('tutorial');
	var ctx = canvas.getContext('2d');   // type 2d is 2 dimensional
In the first line we retrieve the canvas DOM node using the getElementById method.
The fallback content is displayed in browsers which do not support <canvas>;
scripts can also check for support when they execute.
This can easily be done by testing for the getContext() method.
Our code snippet from above becomes something like this:
	var canvas = document.getElementById('tutorial');
	if (canvas.getContext){
	  var ctx = canvas.getContext('2d');
	  // drawing code here
	} else {
	  // canvas-unsupported code here
	}
Here is a minimalistic template, which we'll be using as a starting point for later examples. You can download this file to work with on your system.
	<html>
	  <head>
		<title>Canvas tutorial</title>
			<script type="text/javascript">
			  function draw(){
				var canvas = document.getElementById('tutorial');
				if (canvas.getContext){
				  var ctx = canvas.getContext('2d');
				}
			  }
			</script>
		<style type="text/css">
			 canvas { border: 1px solid black; }
		</style>
	  </head>

	  <body onload="draw();">

		<canvas id="tutorial" width="150" height="150">   </canvas>

	  </body>
	</html>
If you look at the script you'll see I've made a function called draw,
which will get executed once the page finishes loading
(via the onload attribute on the body tag).
This function could also have been called from a setTimeout, setInterval,
or any other event handler function just as long the page has been loaded first.
To start off, here's a simple example that draws two intersecting rectangles, one of which has alpha transparency. We'll explore how this works in more detail in later examples.
	<html>
		 <head>
		  <script type="application/javascript">
			function draw() {
			  var canvas = document.getElementById("canvas");
			  if (canvas.getContext) {
				var ctx = canvas.getContext("2d");

				ctx.fillStyle = "rgb(200,0,0)";
				ctx.fillRect (10, 10, 55, 50);

				ctx.fillStyle = "rgba(0, 0, 200, 0.5)";
				ctx.fillRect (30, 30, 55, 50);

			  }
			}
		  </script>
		 </head>
		 <body onload="draw();">
		   <canvas id="canvas" width="150" height="150"></canvas>
		 </body>
		</html>
Simple Example
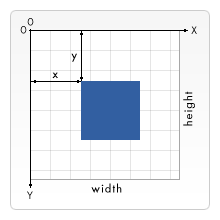
Before we can start drawing, we need to talk about the canvas grid or coordinate
space.
The HTML template on the previous page had a canvas element 150 pixels wide
and 150 pixels high.
I've drawn this image with the default grid overlayed.
Normally 1 unit in the grid corresponds to 1 pixel on the canvas.
The origin of this grid is positioned in the top left corner (coordinate (0,0)).
All elements are placed relative to this origin.
So the position of the top left
corner of the blue square becomes x pixels from the left and y pixels from the top
(coordinate (x,y)).
Later in this tutorial we'll see how we can translate the origin
to a different position, rotate the grid and even scale it.
For now we'll stick to the default.
Unlike SVG
(Scalar Vector
Graphics), canvas only supports one primitive shape - rectangles.
All other shapes must be created by combining one or more paths.
Luckily, we have a collection of path drawing functions which make it
possible to
compose very complex shapes.
First let's look at the rectangle. There are three functions that draw rectangles on the canvas:
fillRect(x,y,width,height) : Draws a filled rectangle
strokeRect(x,y,width,height) : Draws a rectangular outline
clearRect(x,y,width,height) : Clears the specified area,makes it fully transparent
Each of these three functions takes the same parameters.
x and y specify the position on the canvas (relative to the origin)
of the top-left corner of the rectangle. width and height are pretty obvious.
Let's see these functions in action.
Below is the draw() function from the previous page,
but now I've added the three functions above.
Rectangular shape example
		function draw(){
		  var canvas = document.getElementById('tutorial');
		  if (canvas.getContext){
			var ctx = canvas.getContext('2d');

			ctx.fillRect(25,25,100,100);
			ctx.clearRect(45,45,60,60);
			ctx.strokeRect(50,50,50,50);
		  }
		}
View this example
	function drawShape(){
		// get the canvas element using the DOM
		var canvas = document.getElementById('tutorial');

			// Make sure we don't execute
			// when canvas isn't supported
		if (canvas.getContext){

			// use getContext to use the canvas for drawing
		var ctx = canvas.getContext('2d');

			// Draw shapes
		ctx.fillRect(25,25,100,100);
		ctx.clearRect(45,45,60,60);
		ctx.strokeRect(50,50,50,50);
		}
	}

The result should look something like the image on the right.
The fillRect function draws a large black square 100x100 pixels.
The clearRect function removes a 60x60 pixels square from the center
and finally
the strokeRect draws a rectangular outline 50x50 pixels
inside the cleared square.
In the following pages we'll see two alternative methods for the
clearRect function and we'll also see how to change the color and stroke
style of the rendered shapes.
Unlike the path functions we'll see in the next section,
all three rectangle functions draw immediately to the canvas.